To get your online employee schedules created fast, efficiently, and accurately, set up your system first so that it does the heavy lifting for you later. Here's a complete guide to setting up your scheduler.
Preparing To Create Your First Schedule
You’ll want to complete these steps outlined before creating a schedule. For bulk employee imports, or help completing the following steps please book your setup session using this calendar.
Step 1 Add Positions
To Access: Click Schedules icon (top nav bar) ➡️ settings (yellow nav bar) ➡️ positions
- Add Position Name. Positions are titles for job responsibilities in your business.
- Choose Location(s): (Optional) Learn more about locations
- Default Wage: (Optional)
- Choose Color Label: (Optional) changes the color label on schedule.
- Click Add
To Edit a Position Name, click on the Position on the left, and edit the information for the Position on the right. Click Save.
Step 2 Add Employees
To Access: Click Schedules icon (top nav bar) ➡️ Employees (yellow nav bar) ➡️ Green Add Employee button
- Enter the First and Last name of the new employee
- Enter their Email Address
- If you do not add the email address, the employee will not get notified that they have been added, and they will not be able to login to ShiftNote. You can add an email address at a later date as well.
- Click Save
Note: For bulk imports use this spreadsheet and email to onboarding@shiftnote.com
Assign Position(s) To Employee
To Access: Click Schedules icon (top bar) ➡️ Employee (yellow bar) ➡️ Find Employee ➡️ Click Edit links under quick links ➡️ Click the Positions tab
- Choose a position from the drop down menu
- Add a number to show Position Ranking. 0 being the employee's primary position, and 1 the next, and so on. This helps the system manage RTO and staffing pars.
- Add or edit the wage the employee makes per hour. Leave blank If you do not wish to include a wage.
- Click Add Position
Note: Employees can be assigned more than one position.
Step 3 Add Employee Work Availability
To Access: Click Schedules icon (top nav bar) ➡️ Employees (yellow nav bar) ➡️ Find Employee ➡️ Click Edit link under quick links ➡️ Click the Availability tab
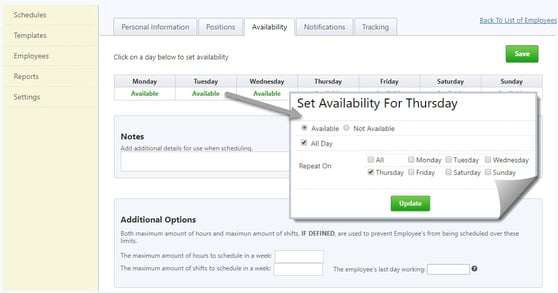
- To set or edit availability, click the green Available link on a day of the week
- Fill out the availability and repeat on days. For partial days uncheck the All Day box and fill in Time In and Time Out.
- Once the availability is set, click Save
- In Notes Section: You can also list additional information about availability for display box in schedule creator.
- Under Additional Options (optional) you can enter maximum amount of hours or shifts so the employee will only be available to be scheduled to work the set amount of shifts or hours entered.
Step 4 Block or Limit Request For Time Off
To Access: Click Board icon (top nav bar) ➡️ Request Time Off (yellow nav bar) ➡️ Click Block Requests tab
- For partial day: uncheck the All Day box and enter start and end times
- Enter number of employees allowed to request off during set time period. Use the Daily checkbox to limit number of employees allowed off by day, or in total during set time period.
- Position choose between All or a single position
- Add Reason: to the text box so everyone knows why the time was blocked off (i.e Holiday)
- Click Submit
To Cancel a Blocked Request: click Cancel in the right hand column under Block Time Off History
Important: When an employee request time off for a date that has limits or block on it, the system looks at all employees with the 0 primary position.
Step 5 Scheduler Settings
To Access: Click Schedules icon (top nav bar) ➡️ Settings (yellow nav bar)
Manage Who Can Approve RTO and Availability Request
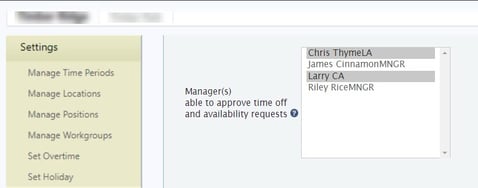

To Access: go to Scheduler Icon > click Settings in the yellow nav bar
- Go to Availability
- All managers highlighted will be able to manage RTO
- Click Save
Manage Time Periods
- Type in a Time Period Name, choose the a start and end time, and click Add.
- To edit a Time Period, click on the Time Period on the left, and edit the information for the Time Period on the right.
- Click Save
Time Periods are great for filtering and used to see labor stats by business period.
Manage Locations
Important: Locations are a way to specify where an employee will be working their position within the business. For example, if an employee is scheduled as a server in a restaurant, you can select that they also work in Section 1. Locations are optional.
- Type in a Location Name and click Add.
- To edit a Location name, click on the Location on the left, and edit the information for the Location on the right.
- When you create a position, you can then choose which locations the position can be worked in.